Trailers are among the most functional, unpowered vehicles you can own. These detachable locomotives are used for the transport of materials and goods that can’t fit into your SUV. Available in all sizes, models, and designs, these vehicles are used for various purposes, such as racing, construction, landscaping, hunting, farming, hobbies, or moving. Trailers are so versatile; they can also be used for travel, recreational vehicle, or even as mobile homes. 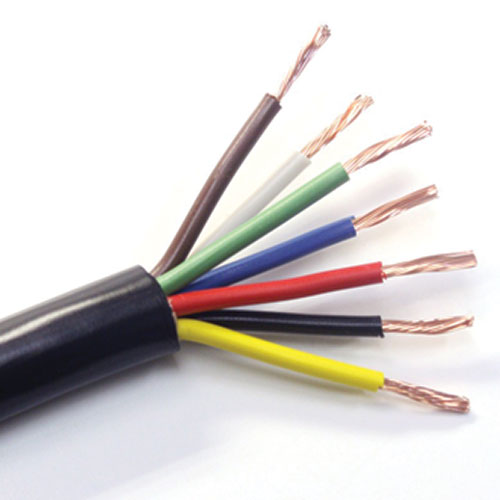
Just like any other locomotive, safety is a top concern when using trailers on the road.
One of the most commonly overlooked safety feature is the trailer light wiring system. It might seem insignificant, but any problem with the trailer cable can lead to unwanted road mishaps and needlessly serious injury or death.
Imagine towing a trailer with defective brake lights or dim signal lights. Other motorists and pedestrians might not recognize that your vehicle has extended equipment hooked to it. This can lead to a hazardous scenario.
If your trailers’ turn indicators have glitches, other drivers will be unaware of your direction and speed changes – whether you’re turning (right or left) or slowing down. Without directional indicators, you can get run over by a speeding vehicle when you make a turn. Again, this compromises your safety and that of others.
Fully functional trailer lights are essential to be a careful and aware driver on the road. But just like any other car parts, the trailer light system wears out over time. Proper upkeep and troubleshooting of the trailer cable and wiring are vital every time your trail hits the road, especially if it is rarely used.
But before we delve on trailer light wiring maintenance, it’s best to understand what a trailer connector is.
A conventional trailer attaches to the towing vehicle through its coupler, that is hooked onto the towing vehicle’s ball mount. For extra safety, some use crisscrossed safety chains. Aside from these attachment mechanisms, there is also the trail connector which holds the electrical conductors between the trailer and the vehicle.
The trailer connector contains the trailer cable that supplies power to the tail lights, license plate, turn indicators, brake lights, position side markers, reverse light, auxiliary and ABS power, and grounding.
These multi-conductor cables are manufactured with a PVC external jacket and color-coded wires inside. Each wire is made of stranded copper and color-coded for easy identification and installation. These wires are available in spools as well as pre-cut lengths.
There are several types of trailer cables that include 4-core trailer wire, 5-core trailer wire, 6-core trailer wire, and 7-core trailer wire. The type of cable used in a trailer depends on the number of lighting or accessories that needs to be powered up.
To effectively troubleshoot and repair a trailer lighting system, you need a number of wiring tools on hand that include: 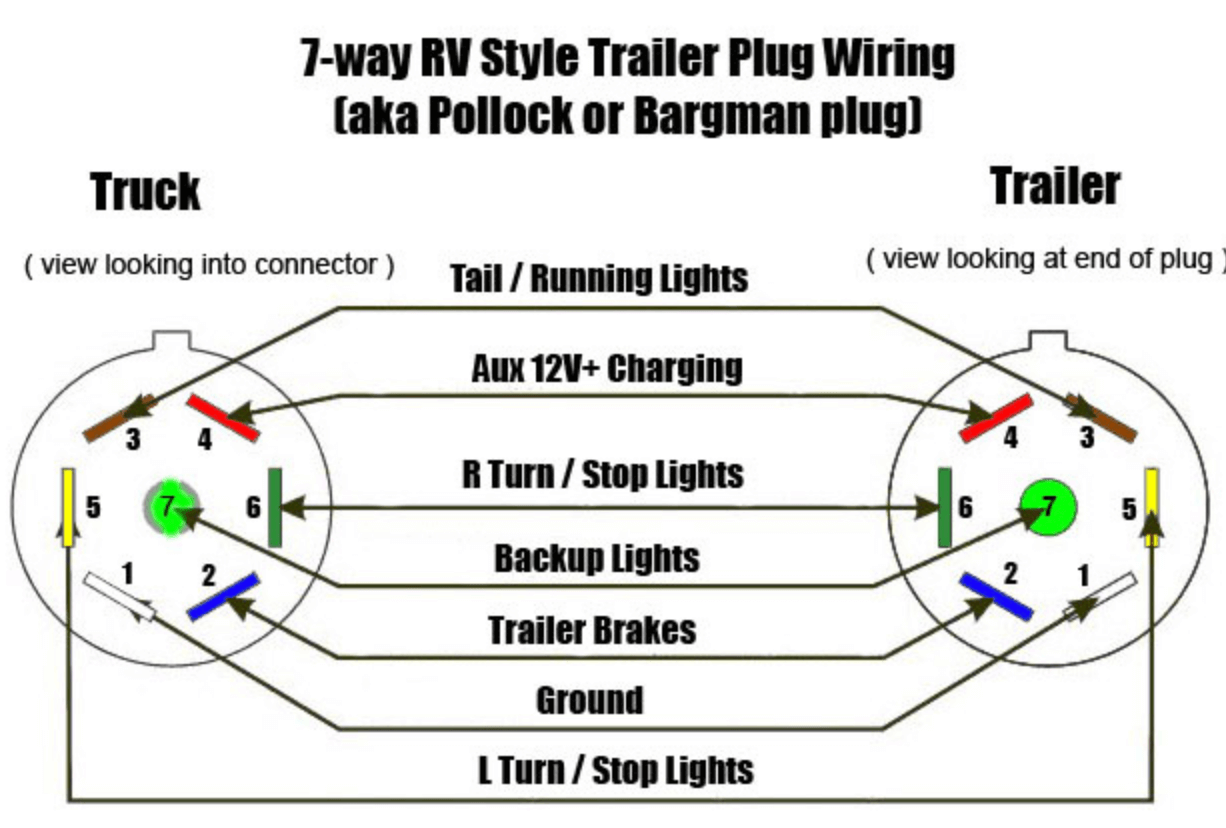
· circuit tester (12V probe-style),
· wire stripper,
· various wire fasteners (quick splice connectors, butt connectors, and ring terminals)
· electrical tape,
· dielectric grease,
· power drill,
· 12V battery pack,
· trim fastener removal tool,
· flat-head screw driver, and
· extra trailer wires.
These tools are easily available at your local hardware shops. You can also buy wiring kits that include most of these items.
If the trailer light or electrical circuitry has some problems, you can diagnose the issues and troubleshoot them on your own. If the problem is just a simple bulb switch replacement, you can DIY it with ease. But in some cases, the trouble would need more than just unscrewing and screwing.
For example, major portion of the trailer wire located in a hard to reach area might have already corroded and requires rewiring. Major glitches like this are best left in the hands of professionals. So, don’t insist on buying a spool of 5-core trailer wire replacement set without properly diagnosing the problem.
When troubleshooting a wiring system, testing is the key. The problem can originate at any point of the installation. It can either be within the trailer or the tow vehicle. Identifying where the root cause is located is crucial. But with so many things to check, you might have a hard time knowing where to start.
Here we take a look at some strategies to help you pinpoint the root cause of the malfunction.
You can start by checking the bulbs if there are any burned out bulbs that need replacement. If the bulbs are working fine, detach the trailer connector from the tow vehicle. Check every light of the tow vehicle (brake lights, turn signals, and backup lights) to see if the problem is within the tow vehicle’s electrical system.
If no malfunctions are noted with the vehicle’s lighting system, you can check out the tow vehicle socket. Use a trailer wiring tester or a multi-tester that is compatible with the tow vehicle connector. Connect the tester into the socket. You can use an attachment to ensure that there the tester fits snugly into the socket. The indicator will help determine whether electric current is adequately supplied to each cable wire or not.
If there is sufficient electrical supply in each individual wire, the problem might be with the trailer cable system. If, after several attempts, the tester does not indicate power, then the problem could probably be with the tow vehicle.
On the other hand, if the tester detects electricity when it should not, such as a faulty or phantom turn signal, then the tow vehicle could have a ‘short.’ Here you need to check the tow vehicle’s wiring diagram to see if wires contact with each other.
In some cases, you’ll get faulty signaling due to several wires that are connected to improper connection points. You should go back to the trailer wiring diagrams to properly identify, isolate and troubleshoot the problem. In case the diagram does not seem to reflect the light indicators, you will need to strip open the trail cable to individually isolate and swap the wires. Once the connections are repaired, you should crimp the cable again.
One of the topmost problems of trailer wiring is the grounding. Check and clean the ground connections. Every component has its own ground that is attached to the trailer’s body. Usually, flickering trailer lights suggest faulty grounding, or the use of hitch instead of dedicated ground wire. When choosing a light mounting area, it should be clean, paint-free and not made of aluminum.
Make sure the ground does not share other wires on a screw. If this is the case, try transferring it to a separate screw. If this is not possible, you can place it at the bottommost so that it touches the trailer frame. However, for best performance, each component should have a dedicated ground. This minimizes the possibility of a ground issue on one component that impacts the whole wiring installation.
Inspect the vehicle and trailer plugs for possible corrosion. This appears as greenish or whitish dust in the metal surface. If there is corrosion beneath the insulation, replace the ground wire. It is recommended that you replace the last several feet of the corroded wire. Alternatively, you can clean it thoroughly using a wire brush and a battery terminal cleaner.
Again, the importance of secured and clean grounding cannot be overemphasized. In fact, performing a thorough cleaning of the ground might just do the trick. In some cases, it might need several tries before you can get the trail light to work.
A common problem with old trailers is that the terminals are non-sealed and crimp-only. These terminals, even though they look secured, tend to have a weak connection. With the constant motion of the wire strands, the terminals can become corroded over time. Crimp and solder connector can help ensure formidable protection to the terminals. With these specialized connectors, voltage does not drop through the connection. It also safeguards the terminal from any contaminants.
Perhaps the problem is not with the 5-core trailer wire but with the fuse. Go to the powered converter and check if the fuses are functional and not busted.
You should also check the lighting fuses of the tow vehicle. Some wiring systems will have in-line fuses; if so, inspect both the vehicle side and trailer if there are any problems. If, after replacing the fuses, they still blow up, the circuit is probably overloaded. Replacing the trailer lights with LEDs might help minimize the load and avoid further blowing the fuse.
Check the maximum amperage capacity of the harness. Determine the total amperage draw of the trailer lights to see if it goes beyond the maximum rating of the harness. If the overload is not that extensive, you can reset the unit by removing the fuse and reinstalling it after 30 minutes. Then, check if the connector functions well using a 12V probe-style circuit tester. If all functions are restored after the reset, then the trailer may have a short that causes overdraw, or the trailer lights draw higher amperage. You can try removing some of the lights and replacing them with low-amperage LED lights.
To determine if the trailer wiring is good, detach the trailer from the tow vehicle. Then, connect the wiring harness to a battery-pack. Link the colored trailer wires to the positive terminal and the white wire to the negative terminal. If the trailer lights all function without an issue, then the trailer wiring system is all-good and the problem is with the vehicle.
It can be quite difficult to pinpoint problem areas, especially if the corrosion occurs from inside. As the wires age, the insulation gradually becomes brittle and cracks open. This can result in shorts. Repairing the corroded portion might provide a quick but short-lived fix. Soon, there will again be corrosion in some portions of the wiring system – and you will again fix it. However, repeated fixes can be quite troublesome and might even put your trailer in great danger due to potential short circuit.
Instead of repeated and costly wiring repairs, it might best to do a one-time rewiring. Surprisingly, a set of trailer wiring kit and a spool of 7-core trailer wire is reasonably priced. Installing a new trailer light wiring system is actually simple – something you can do on your day-off.
Over time, your utility trailer will start to show wear and tear. Trailer lights and trailer cable are among the first to show these unwanted signs of aging. However, these safety features are a must – not only because they are legally mandated – but more importantly because they will protect you from danger.
Considering the importance of trailer lights, it is vital for you to check your lights every time you head out. Most problems, such as a blown fuse, bad grounding, or a burned-out bulb, can be easily solved. Meanwhile, other trail light issues might need more time and troubleshooting. By following the steps discussed above, you can maintain your trailer light in great shape.

